One photographer I researched into is the Wildlife and Nature photographer Daniel Walker. His work gave me the idea to work on something to do with the environment as it's something extremely overlooked and ignored.
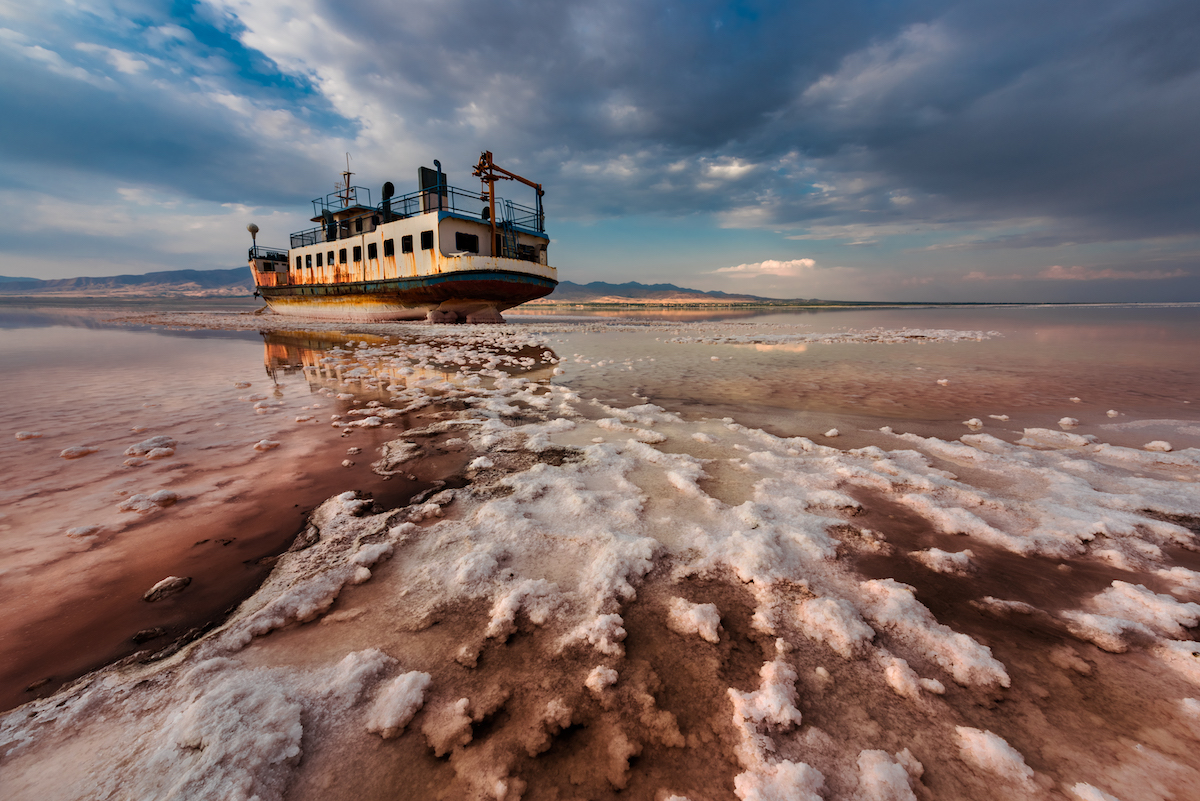
Another photographer I looked into is Saeed Mohammadzadeh. His picture won him the environmental photographer of 2018 award and it gave me the idea to potentially work around something to do with water pollution.
With cameras I have learnt what aperture and shutter speed changes in an image and which f stop goes with which shutter speed.
My creative intention with my final project was to make people aware of the pollution and fly tipping occurring in the local area. Daniel Walker's photography gave me the idea to not just focus on fly tipping because that's a very small area of what's going on. Especially considering the numerous formats that pollution can occur in.
The only issue that I faced during this project was the weather. Due to my photos being taken outside the rain and cold didn't particularly help with allowing me to takeep my photos. Luckily there was a day in which it was sunny enough to photograph, although it did begin raining just before I finished up my project.
Showing posts with label Photography. Show all posts
Tuesday, 26 February 2019
Monday, 28 January 2019
Photography Project - Planning
My chosen genre of photography is environmental photography. My theme is going to be about how dirty London is, especially Waltham Forest. As Waltham Forest is the borough of culture this year the bad parts of the borough are going to be left unseen by the public so I'm going to bring the environmental issue to light.
My target audience is going to be teenagers and young adults in the London as the issue is most pressing towards them, and if the issue is not handled soon then there could be no going back.
My layout is going to be an A1 print with a few A3.
My creative intention is to make people aware of the pollution that's being spread within Waltham Forest. Due to Waltham Forest being the borough of culture for 2019 there were a lot of aspects of the borough that were overlooked. The biggest one, in my opinion, being the pollution issue and through my project I wanted to spread awareness of the rubbish being left in our borough.
Research:
Daniel Walker
https://danielwalkerphoto.wordpress.com/2015/03/03/port-kembla-steel-works/
Daniel Walker is a wildlife and environmental photographer based in Australia.

This photo was taken at a steel works in Wollongong, Australia, showing the pollution caused by the large chimneys which are adding greenhouses gasses into the atmosphere. This photo has significance in terms of environmental photography as most people from outside of Australia think the country is a beautiful place with a lot of nature and wildlife. Although, nobody really thinks of the pollution that occurs there the same as other countries.

This is another photo taken by Daniel Walker. This photograph is taken from a collection called Menangle River Reserve. As the name suggests this area is a place for nature, however, there's still pollution. Although this time it's not atmospheric, instead being water pollution as someone has decided to dump a tire in the river.
Saeed Mohammadzadeh
https://mymodernmet.com/environmental-photographer-year-2018/

This photo was taken by Saeed named 'End Floating'. This photo also won the 'Environmental Photographer of the Year 2018'. This photo shows the salty ice melting caused by climate change and global warming. The salt dust is then captured by the breeze in the air and can cause serious eye, skin and lung damage.
My target audience is going to be teenagers and young adults in the London as the issue is most pressing towards them, and if the issue is not handled soon then there could be no going back.
My layout is going to be an A1 print with a few A3.
My creative intention is to make people aware of the pollution that's being spread within Waltham Forest. Due to Waltham Forest being the borough of culture for 2019 there were a lot of aspects of the borough that were overlooked. The biggest one, in my opinion, being the pollution issue and through my project I wanted to spread awareness of the rubbish being left in our borough.
Research:
Daniel Walker
https://danielwalkerphoto.wordpress.com/2015/03/03/port-kembla-steel-works/
Daniel Walker is a wildlife and environmental photographer based in Australia.

This photo was taken at a steel works in Wollongong, Australia, showing the pollution caused by the large chimneys which are adding greenhouses gasses into the atmosphere. This photo has significance in terms of environmental photography as most people from outside of Australia think the country is a beautiful place with a lot of nature and wildlife. Although, nobody really thinks of the pollution that occurs there the same as other countries.

This is another photo taken by Daniel Walker. This photograph is taken from a collection called Menangle River Reserve. As the name suggests this area is a place for nature, however, there's still pollution. Although this time it's not atmospheric, instead being water pollution as someone has decided to dump a tire in the river.
Saeed Mohammadzadeh
https://mymodernmet.com/environmental-photographer-year-2018/

This photo was taken by Saeed named 'End Floating'. This photo also won the 'Environmental Photographer of the Year 2018'. This photo shows the salty ice melting caused by climate change and global warming. The salt dust is then captured by the breeze in the air and can cause serious eye, skin and lung damage.
Thursday, 13 December 2018
White Backdrop with Blue Gel Lights
To get this picture we used the white backdrop. We also used a blue gel light to the back right of the model and a white cone light and polyboard reflecting the light onto the backdrop to the back left of the model. We had both the lights on a high setting and on flash so the model was visible, but the front was a little bit dark in order to create a slight contrast.
For this picture we had a very similar setup to the previous setup, except for a key light that we added to on the lowest setting to give the model a little bit more brightness while still keeping the model in contrast to the backdrop.
This was the first picture that we took with this idea in mind. As you can see the model is too dark and the background is a lot bluer than the other attempts. We had the same setup as the first image but on lower settings making the gel light overpower the cone light.
Saturday, 1 December 2018
My High-Key Photography
In order to get this picture we used one cone light facing the backdrop with one poly board reflecting the light away from the model. We also had our key light to the right of the model lighting their face in contrast. There was then a back light that we used to differentiate the model from the background. To get the blue tint around the outside of the model we used a phone torch that was being held by the model on their lap and was being shone towards their face.
For this picture we had our key light to the right of the model shining on their face and we had the backlight to the right of the model too. We also had a cone light and polyboard shining onto the background from the left of the model in order to make the right half of the background brighter than the left, thus in contrast. This was the opposite of the lighting that we used on the model as the lights were reversed so that the right side of the model was brighter than the left, therefore, again, creating contrast.
Thursday, 15 November 2018
Silhouette Lighting Photography
It doesn't matter which colour backdrop you have because your frame is the softbox light itself
To make it effective, turn the light up to 6 to begin with and see how the light is affecting the photo.
Remember to move the model and/or light if necessary.
The images above and below shows an image of silhouette photography. To get this image we used one softbox light on setting 5. The ISO on your camera has to be relatively low in order for the model to appear as a silhouette. Due to the angle at which the photo was taken, we can see a slight shine of the model's lips. However, other than that we are just left with an outline of the model. These images were also taken in monochrome mode (black and white).
This image was taken in vivid mode (colour). We also had an assistant holding a white polyboard to the right side of the model's face to reflect the light onto the front. This gives you the effect of having one side of the face in the light and one not. The settings on the light and camera have not changed.
This image is taken in the same way as the one above, however, the camera is now on monochrome mode.
Thursday, 8 November 2018
Monday, 5 November 2018
Low-Key Photography
The Principles of Low-Key Lighting
Low-key photography is all about shadows and contrasts.
In low-key photography you almost always use a black backdrop.
Use of imagination with the lighting will create better photos.
For low-key photography you need to set the camera to a low ISO level.
TYPE 1 of Low-Key Photography
Use the boom pole light for the back light.
Start with the settings on the lights as 4, then see whether it's too bright or dark for you.
This is typically good for a profile shot.
TYPE 2
Use two lights and two polyboards to reflect the light onto the model.
TYPE 3
Use the silver brollies and only the silver brollies to reflect the light onto your model.
Low-key photography is all about shadows and contrasts.
In low-key photography you almost always use a black backdrop.
Use of imagination with the lighting will create better photos.
For low-key photography you need to set the camera to a low ISO level.
TYPE 1 of Low-Key Photography
Use the boom pole light for the back light.
Start with the settings on the lights as 4, then see whether it's too bright or dark for you.
This is typically good for a profile shot.
TYPE 2
Use two lights and two polyboards to reflect the light onto the model.
TYPE 3
Use the silver brollies and only the silver brollies to reflect the light onto your model.
Thursday, 1 November 2018
ISO Digital Photography and White Balance
In digital photography, ISO stands for International Standards Organisation.
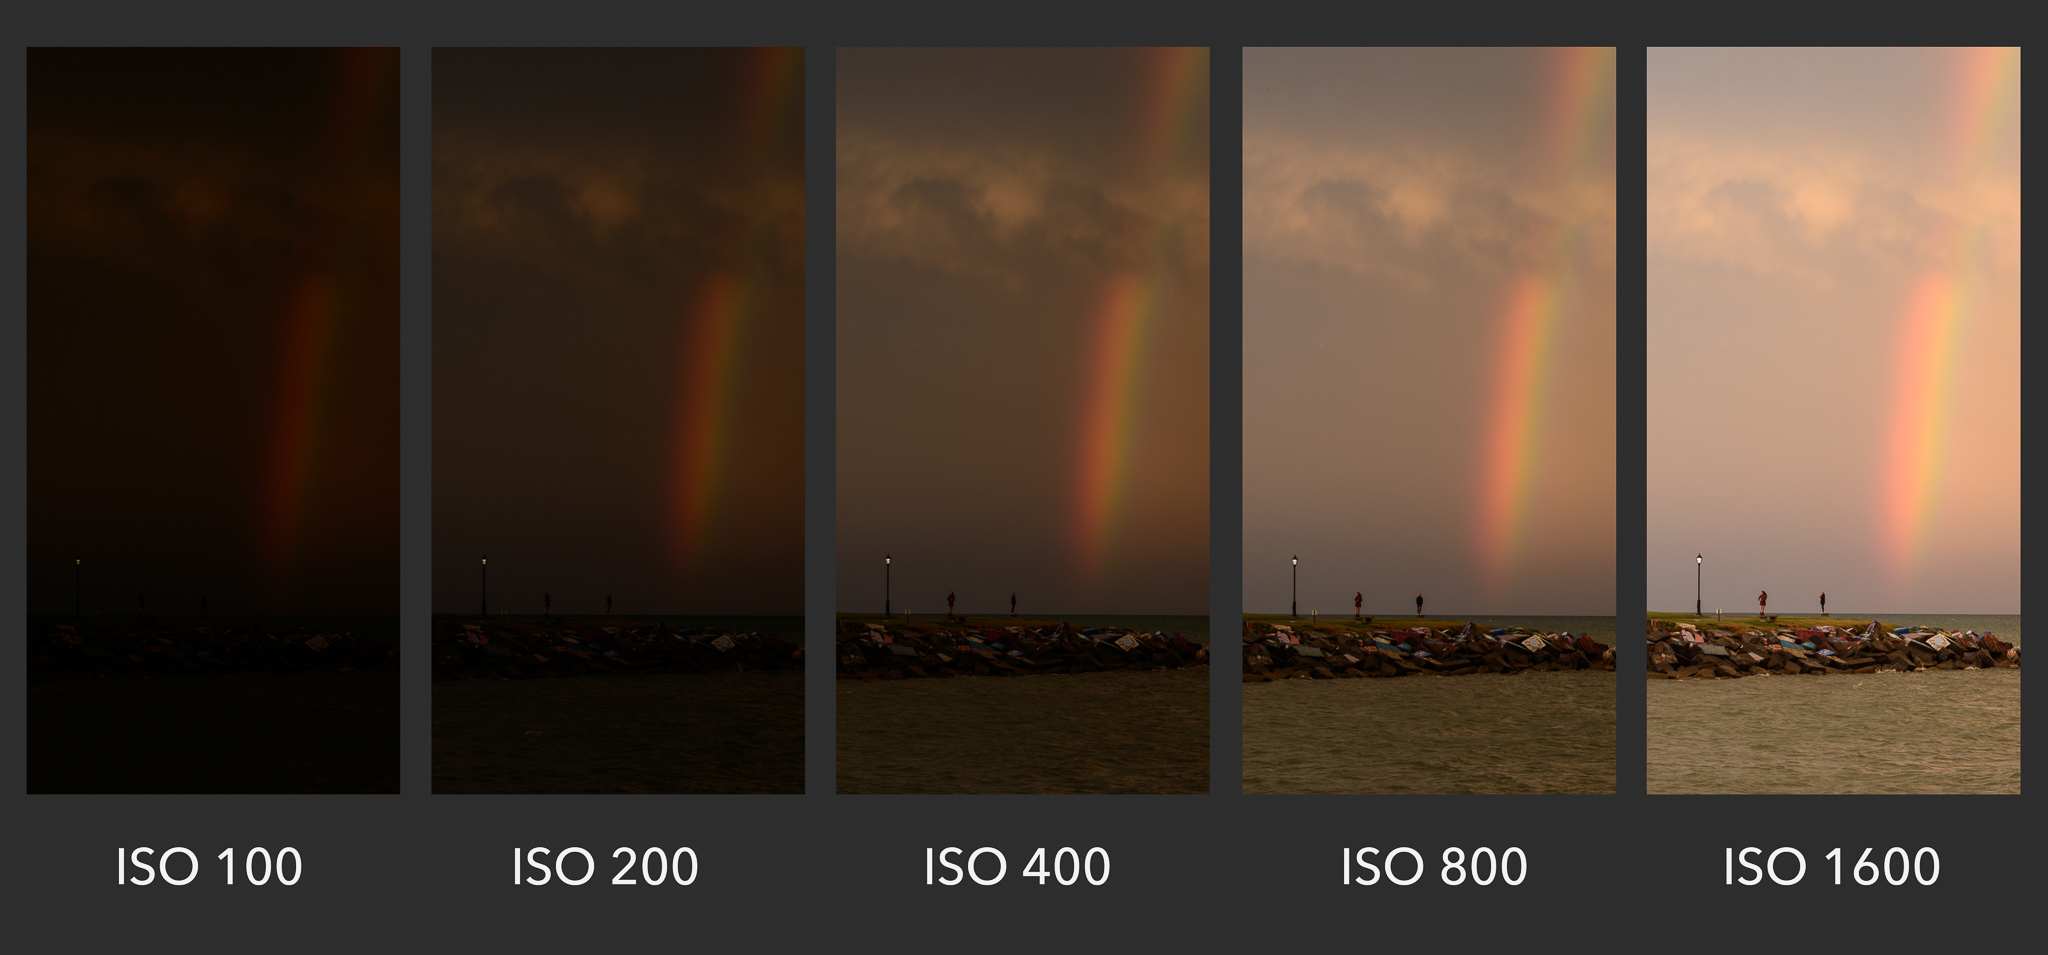
The ISO setting changes the sensitivity of light sensor in the camera. This means that with a higher ISO, for example 1600, you will have a brighter image than with a lower ISO e.g. 100. However, the higher the ISO of your image, the more grainy and noisy your image will look, this is why most cameras automatically set the ISO to 100 for little to no noise in the image. ISO goes hand-in-hand with aperture and shutter speed. The ISO setting that you have your camera on can also be determined by what you're taking a picture of. For example, if taking a picture of a dark room without using studio lights or flash you would set the ISO high to allow the sensor to capture more light.
White Balance, represented by WB on a camera, is changing the camera's sensitivity to certain colours of light. For example, the white balance can be changed so that the colour red is more prominent in the image. This can really define what we focus on as the viewer as our eyes are drawn to different parts of the image. White balance uses the temperature scale Kelvin, meaning that the higher the number, the more distinct the blue colours are and the lower the setting the more red is distinct. The white balance is changed in an image depending on what light source we are using. For example, if you were to use a candle light (1000 - 2000 K), you would have the white balance set lower than if you were using electronic flash (5000 - 5500 K)
The ISO setting changes the sensitivity of light sensor in the camera. This means that with a higher ISO, for example 1600, you will have a brighter image than with a lower ISO e.g. 100. However, the higher the ISO of your image, the more grainy and noisy your image will look, this is why most cameras automatically set the ISO to 100 for little to no noise in the image. ISO goes hand-in-hand with aperture and shutter speed. The ISO setting that you have your camera on can also be determined by what you're taking a picture of. For example, if taking a picture of a dark room without using studio lights or flash you would set the ISO high to allow the sensor to capture more light.
White Balance, represented by WB on a camera, is changing the camera's sensitivity to certain colours of light. For example, the white balance can be changed so that the colour red is more prominent in the image. This can really define what we focus on as the viewer as our eyes are drawn to different parts of the image. White balance uses the temperature scale Kelvin, meaning that the higher the number, the more distinct the blue colours are and the lower the setting the more red is distinct. The white balance is changed in an image depending on what light source we are using. For example, if you were to use a candle light (1000 - 2000 K), you would have the white balance set lower than if you were using electronic flash (5000 - 5500 K)
Monday, 15 October 2018
My Favoured Photography
I like how the photographer has captured various bright and warm colours in the picture. This photo clearly capture the setting Sin along with the horizon line. This cave reflects the orange tone of the Sun on the rocks creating a nice bronze shade. The camera also captures the flowing waves which also reflects the Sun's rays in a captivating way.
Friday, 12 October 2018
F Stops and Shutter Speed Explaination

This image was taken with a low F Stop, that most likely being around 1.8. This gives the image a shallow depth of field. However, because more light is being allowed into the lens, the shutter speed must increase in order to keep the brightness of the image at a suitable standard. The fact that more light is being allowed into the lens but being captured at a faster rate means that the light that was in front is captured nicely, although the light that was behind is gradually captured in a worse quality, becoming blurry, thus, creating a shallow depth of field.
This is an example of a high F Stop (F 32). This allows less light into the lens but slows the shutter speed down so the light is captured slower. This means that everything in frame is in focus giving you Depth of Field.
Technical Terms Photography
F Stops/ Aperture - F, 1.8, 2.8, 4, 5.6, 8, 11, 16, 32 (Controls the amount of light that travels through the lens) 1.8 - 8, more light through the lens WIDER APERTURE. 8 - 32, less light SMALLER APERTURE.
Shutter Speed - 1/8, 1/15, 1/30, 1/60, 1/125, 1/250, 1/500 (Controls how fast or slow light travels through the lens) 1/8 - 1/60, slow shutter speeds. 1/60 - 1/500, fast shutter speeds. Faster Shutter Speeds allow you to capture movement better. Burriness is captured from a slower shutter speed.
- Shallow Depth of Field - foreground is in focus, and background is out of focus (Controlled by Aperture) Lower F Stop gives you Shallower Depth of Field.
- Depth of Field - when both background and foreground are in focus. Higher aperture give you DoF.
F, 1.8, 2.8, 4, 5.6, 8, 11, 16, 32
1/8, 1/15, 1/30, 1/60 , 1/125, 1/250, 1/500
F stops and shutter speeds must match up or the image will end up either too bright or too dark. The lower the F Stop, the faster the shutter speed and vise versa.
M - Manual - you control both aperture and shutter speed
A - Aperture Priority - you control the aperture and the camera automatically does the shutter speed
S - Shutter Priority - you control the shutter speed while the camera does the aperture
Rule of Thirds
The rule of thirds is a square grid that allows the photographer to frame the subject better. This gives the photographer a better understanding of where to have things in the frame if not being centered.
Horizon Line
The horizon line
Rule of Thirds
The rule of thirds is a square grid that allows the photographer to frame the subject better. This gives the photographer a better understanding of where to have things in the frame if not being centered.
Horizon Line
The horizon line
Monday, 24 September 2018
Photography Studio Induction
When taking photos of someone in the studio, they must stand 5-6ft in front of the backdrop so they don't blend in.
Three point lighting:
Key Light - this light is used on its own to create contrast
Fill Light - this light removes the shadow created from the key light
Back Light - allows the image to look more 3D
Dials on Lights- 1 is the lowest setting. Have the dial set on 3 to start with.
Subscribe to:
Posts (Atom)