Monday, 17 December 2018
Thursday, 13 December 2018
White Backdrop with Blue Gel Lights

To get this picture we used the white backdrop. We also used a blue gel light to the back right of the model and a white cone light and polyboard reflecting the light onto the backdrop to the back left of the model. We had both the lights on a high setting and on flash so the model was visible, but the front was a little bit dark in order to create a slight contrast.

For this picture we had a very similar setup to the previous setup, except for a key light that we added to on the lowest setting to give the model a little bit more brightness while still keeping the model in contrast to the backdrop.

This was the first picture that we took with this idea in mind. As you can see the model is too dark and the background is a lot bluer than the other attempts. We had the same setup as the first image but on lower settings making the gel light overpower the cone light.
Saturday, 1 December 2018
My High-Key Photography

In order to get this picture we used one cone light facing the backdrop with one poly board reflecting the light away from the model. We also had our key light to the right of the model lighting their face in contrast. There was then a back light that we used to differentiate the model from the background. To get the blue tint around the outside of the model we used a phone torch that was being held by the model on their lap and was being shone towards their face.

For this picture we had our key light to the right of the model shining on their face and we had the backlight to the right of the model too. We also had a cone light and polyboard shining onto the background from the left of the model in order to make the right half of the background brighter than the left, thus in contrast. This was the opposite of the lighting that we used on the model as the lights were reversed so that the right side of the model was brighter than the left, therefore, again, creating contrast.
Thursday, 15 November 2018
Silhouette Lighting Photography
It doesn't matter which colour backdrop you have because your frame is the softbox light itself
To make it effective, turn the light up to 6 to begin with and see how the light is affecting the photo.
Remember to move the model and/or light if necessary.


The images above and below shows an image of silhouette photography. To get this image we used one softbox light on setting 5. The ISO on your camera has to be relatively low in order for the model to appear as a silhouette. Due to the angle at which the photo was taken, we can see a slight shine of the model's lips. However, other than that we are just left with an outline of the model. These images were also taken in monochrome mode (black and white).


This image was taken in vivid mode (colour). We also had an assistant holding a white polyboard to the right side of the model's face to reflect the light onto the front. This gives you the effect of having one side of the face in the light and one not. The settings on the light and camera have not changed.

This image is taken in the same way as the one above, however, the camera is now on monochrome mode.
Thursday, 8 November 2018


Monday, 5 November 2018
Foley Sound
Foley sound is when you record sound separately to the video and add it on in post production. My group decided to create a chase scene using just foley sound.
Low-Key Photography
The Principles of Low-Key Lighting
Low-key photography is all about shadows and contrasts.
In low-key photography you almost always use a black backdrop.
Use of imagination with the lighting will create better photos.
For low-key photography you need to set the camera to a low ISO level.
TYPE 1 of Low-Key Photography
Use the boom pole light for the back light.
Start with the settings on the lights as 4, then see whether it's too bright or dark for you.
This is typically good for a profile shot.
TYPE 2
Use two lights and two polyboards to reflect the light onto the model.
TYPE 3
Use the silver brollies and only the silver brollies to reflect the light onto your model.
Sunday, 4 November 2018
Thursday, 1 November 2018
Filmmaking Exercise Evaluation - Plan
Skills Developed:
- Camera work (in general)
- Directing
- Lighting
- Sound
Personal Weaknesses:
- Speaking out in a group
- Self confidence
- Framing
- Camera Focus (using that specific camera) (SONY Cyber-shot DSCH300B Bridge Camera)
- Script-writing and Creativity
Target Areas:
- Personal Confidence
- Camera Positioning (for improvement)
- Creativity - coming up with original concepts
- Cleaner cuts while editing
ISO Digital Photography and White Balance
In digital photography, ISO stands for International Standards Organisation.
The ISO setting changes the sensitivity of light sensor in the camera. This means that with a higher ISO, for example 1600, you will have a brighter image than with a lower ISO e.g. 100. However, the higher the ISO of your image, the more grainy and noisy your image will look, this is why most cameras automatically set the ISO to 100 for little to no noise in the image. ISO goes hand-in-hand with aperture and shutter speed. The ISO setting that you have your camera on can also be determined by what you're taking a picture of. For example, if taking a picture of a dark room without using studio lights or flash you would set the ISO high to allow the sensor to capture more light.
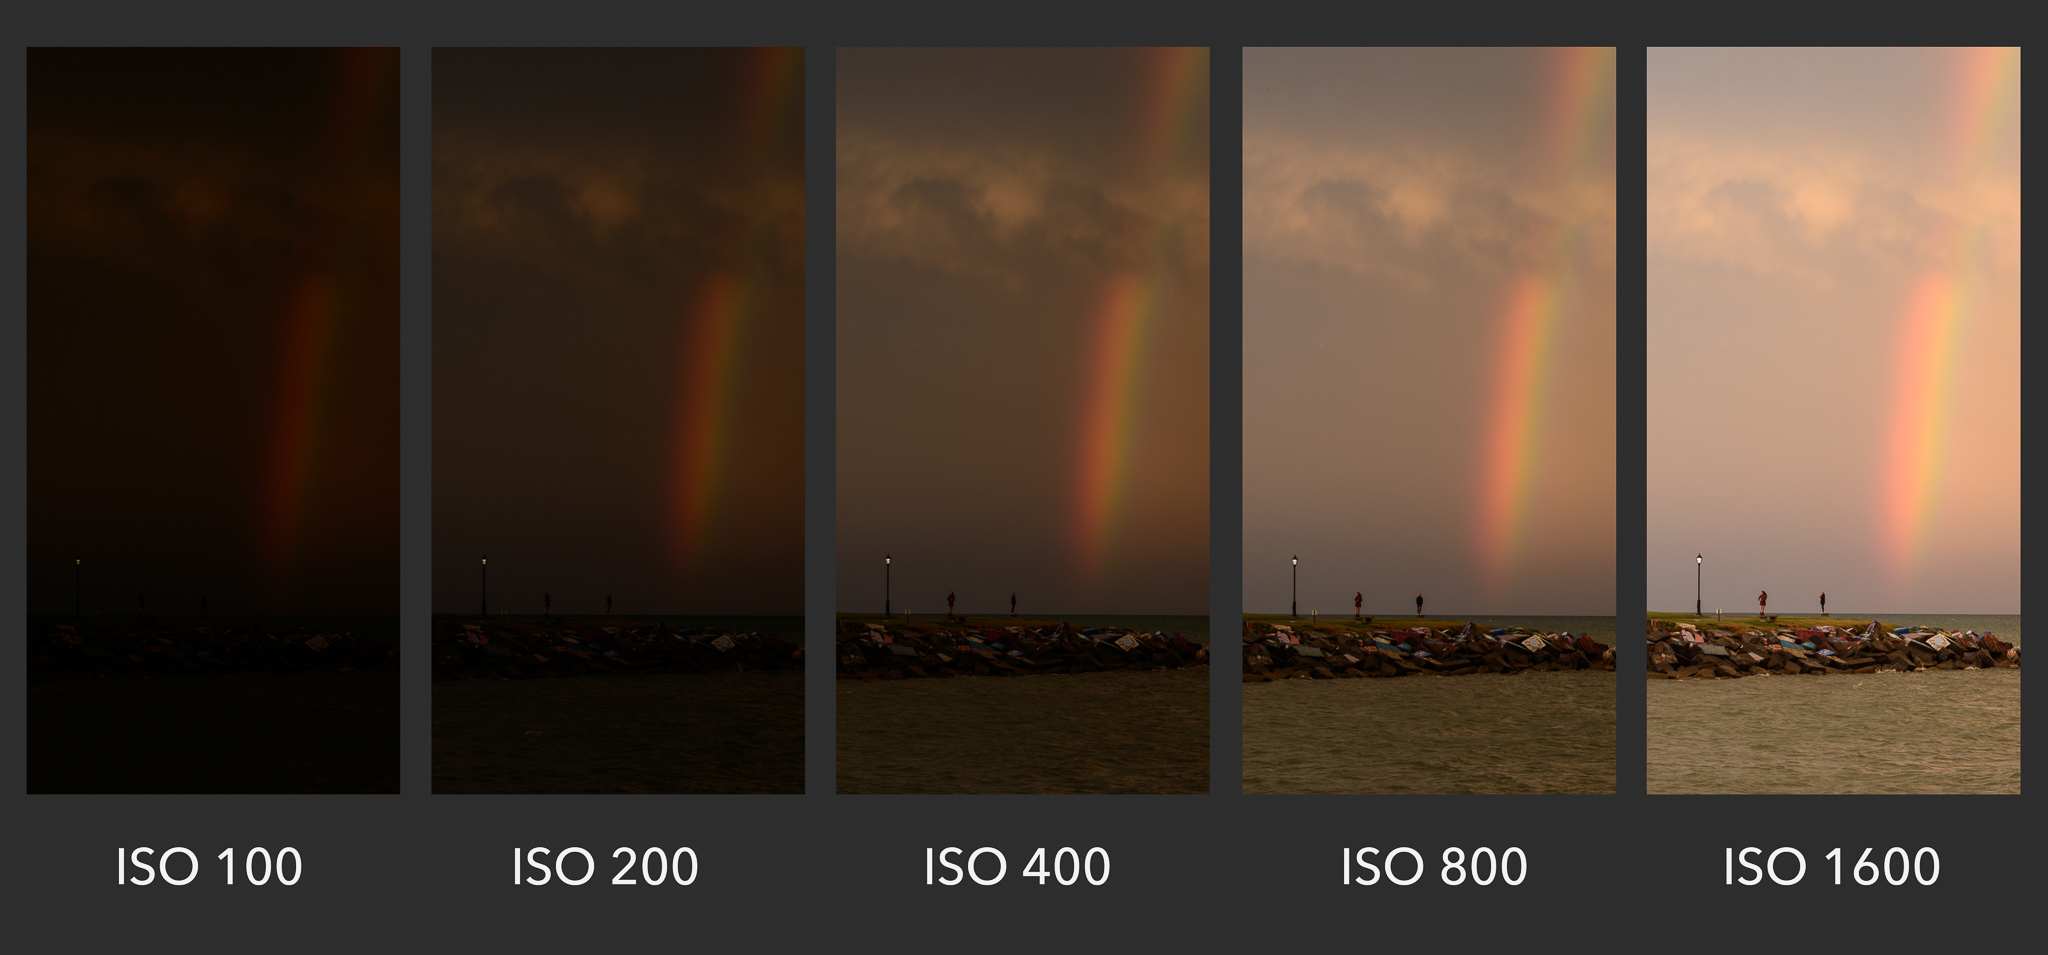

White Balance, represented by WB on a camera, is changing the camera's sensitivity to certain colours of light. For example, the white balance can be changed so that the colour red is more prominent in the image. This can really define what we focus on as the viewer as our eyes are drawn to different parts of the image. White balance uses the temperature scale Kelvin, meaning that the higher the number, the more distinct the blue colours are and the lower the setting the more red is distinct. The white balance is changed in an image depending on what light source we are using. For example, if you were to use a candle light (1000 - 2000 K), you would have the white balance set lower than if you were using electronic flash (5000 - 5500 K)

The ISO setting changes the sensitivity of light sensor in the camera. This means that with a higher ISO, for example 1600, you will have a brighter image than with a lower ISO e.g. 100. However, the higher the ISO of your image, the more grainy and noisy your image will look, this is why most cameras automatically set the ISO to 100 for little to no noise in the image. ISO goes hand-in-hand with aperture and shutter speed. The ISO setting that you have your camera on can also be determined by what you're taking a picture of. For example, if taking a picture of a dark room without using studio lights or flash you would set the ISO high to allow the sensor to capture more light.
White Balance, represented by WB on a camera, is changing the camera's sensitivity to certain colours of light. For example, the white balance can be changed so that the colour red is more prominent in the image. This can really define what we focus on as the viewer as our eyes are drawn to different parts of the image. White balance uses the temperature scale Kelvin, meaning that the higher the number, the more distinct the blue colours are and the lower the setting the more red is distinct. The white balance is changed in an image depending on what light source we are using. For example, if you were to use a candle light (1000 - 2000 K), you would have the white balance set lower than if you were using electronic flash (5000 - 5500 K)
Monday, 29 October 2018
Thursday, 18 October 2018
Monday, 15 October 2018
2nd Movie Clips Analysis
https://www.youtube.com/watch?v=31P4DgkW9Ns
Genre: Animation, Adventure
Mise-en-Scene: Costume - Tradition Chinese Martial Arts Shorts
Props - No Props Used
Setting - CGI Animated Chinese Town
Performance - Martial Arts Fighting Movements/Stances
Genre Typical:
Sound: During this scene there is a score in the background that matches the fight scene being played. All of the sound is foley and
Sound Terminology
Diegetic Sound - sound from within the film world / sound that the characters can hear
Direct Sound - sound that comes directly from the scene
Foley Sound - sound created after the video, over-dubbed in post
Score - music specially written for the film
Soundtrack - music used in the film, but not specifically made for the film
Parallel Sound when the music goes with the images i.e. dramatic music with a fight scene
Contrapuntal Sound - when the music goes against the images i.e. sombre music over a fight scene
Sound Bridge
My Favoured Photography
 I like this picture because the photographer has used long exposure to capture the light from the head and tail lights of the cars. Due to the colour of the lights and the time of day that the picture was taken, this image has nice lines of contrast between the white lights, black/grey background and red lights.
 I really like macro photography because it allows us to see things that we normally aren't able to. Macro photography usually uses bright colours in the background as the most common things to take macro photos of are insects. Insects are usually dull coloured however, when you look closer you can see hints of vibrant colour hidden. This creates a nice contrast with the main image and the background, which is usually a natural green.
 Astrophotography interests me because it allows a photographer to capture the stars and systems. The bright stars contrast the dull colour of the night sky creating a beautiful image.
I like how the photographer has captured various bright and warm colours in the picture. This photo clearly capture the setting Sin along with the horizon line. This cave reflects the orange tone of the Sun on the rocks creating a nice bronze shade. The camera also captures the flowing waves which also reflects the Sun's rays in a captivating way.
Friday, 12 October 2018
F Stops and Shutter Speed Explaination


This image was taken with a low F Stop, that most likely being around 1.8. This gives the image a shallow depth of field. However, because more light is being allowed into the lens, the shutter speed must increase in order to keep the brightness of the image at a suitable standard. The fact that more light is being allowed into the lens but being captured at a faster rate means that the light that was in front is captured nicely, although the light that was behind is gradually captured in a worse quality, becoming blurry, thus, creating a shallow depth of field.
This is an example of a high F Stop (F 32). This allows less light into the lens but slows the shutter speed down so the light is captured slower. This means that everything in frame is in focus giving you Depth of Field.
Technical Terms Photography
F Stops/ Aperture - F, 1.8, 2.8, 4, 5.6, 8, 11, 16, 32 (Controls the amount of light that travels through the lens) 1.8 - 8, more light through the lens WIDER APERTURE. 8 - 32, less light SMALLER APERTURE.
Shutter Speed - 1/8, 1/15, 1/30, 1/60, 1/125, 1/250, 1/500 (Controls how fast or slow light travels through the lens) 1/8 - 1/60, slow shutter speeds. 1/60 - 1/500, fast shutter speeds. Faster Shutter Speeds allow you to capture movement better. Burriness is captured from a slower shutter speed.
Shutter Speed - 1/8, 1/15, 1/30, 1/60, 1/125, 1/250, 1/500 (Controls how fast or slow light travels through the lens) 1/8 - 1/60, slow shutter speeds. 1/60 - 1/500, fast shutter speeds. Faster Shutter Speeds allow you to capture movement better. Burriness is captured from a slower shutter speed.
- Shallow Depth of Field - foreground is in focus, and background is out of focus (Controlled by Aperture) Lower F Stop gives you Shallower Depth of Field.
- Depth of Field - when both background and foreground are in focus. Higher aperture give you DoF.
F, 1.8, 2.8, 4, 5.6, 8, 11, 16, 32
1/8, 1/15, 1/30, 1/60 , 1/125, 1/250, 1/500
F stops and shutter speeds must match up or the image will end up either too bright or too dark. The lower the F Stop, the faster the shutter speed and vise versa.
M - Manual - you control both aperture and shutter speed
A - Aperture Priority - you control the aperture and the camera automatically does the shutter speed
S - Shutter Priority - you control the shutter speed while the camera does the aperture
Rule of Thirds
The rule of thirds is a square grid that allows the photographer to frame the subject better. This gives the photographer a better understanding of where to have things in the frame if not being centered.
Horizon Line
The horizon line
Rule of Thirds
The rule of thirds is a square grid that allows the photographer to frame the subject better. This gives the photographer a better understanding of where to have things in the frame if not being centered.
Horizon Line
The horizon line
Tuesday, 9 October 2018
Film Opening Analysis
Black Panther Scene Analysis
This scene begins with a young child asking his father to tell him the origin story of his homeland. The scene has a black screen for the first 10 seconds then fades into a wide shot of the stars and a meteorite hitting Earth.
The main camera angle throughout this scene is all level with the 'characters' in frame. This is because the story being told shows all of the people involved as equals. However, when the King of Wakanda is first shown there is a slight low-angle because he is more powerful than the other characters.
The camera movements during through this scene are fluid as it is CGI. There are no cuts or transitions. Although, the camera does circle a single point a lot, with the camera circling this one point the background changes from a solid to smoke then to a solid again taking a new form.
The lighting in the scene at the beginning is very dark as we are introduced to an age of war and violence, thus connoting the somewhat 'evil' within the people. After we're introduced to the protagonist of the story everything becomes bright as he glows the same way that the material used to create their city does. This allows us to differentiate between the main protagonist and side characters.
Each character in the frame is in focus as each person is crucial to the scene's development and what happens next.
Sound
All of the sound in this clip is over-dubbed. For example, the voice we hear is a voice over which corresponds to the story being presented on screen. The sound that we hear as part of the characters moving is all foley sound as this is CGI. The score playing is parallel to the scene that is being shown to the viewer. The voiceover is diegetic as it can be heard by the characters in the world of the film.
Friday, 5 October 2018
Induction Task - Evaluation
Skills Learnt/Developed
One of the skills I have developed through this project is photoshop. I used photoshop briefly for my GCSE Media Studies coursework, however, I did not use as much of the program as I did in this task. For example, during this task I learnt how to create a colour overlay using 'Layer Style' feature. This allowed me to change the colour of different aspects of my print advert which made it look more professional. Another feature I used on photoshop for the first time during this task was the 'Dodge Tool'. This allowed me to change the brightness to the main image for my print advert.
Another skill that I developed a lot during this unit was my photography skills and how to correctly use a DSLR camera. I have a DSLR camera of my own although, it is a Canon which I have only used for video. My experience with the Nikon Cameras in the Photography Studio was completely different to the one I had with my Canon camera. This furthered my understanding of how cameras work and how to use them closer to their full potential. Along with the cameras, I learnt a huge amount about lighting and exposure while in the photography studio. Through trying various different intensities of lighting I have learnt which setting go best with what type of image you want. This also goes for the three-point lighting where by turning different lights on and off you can get different effects such as contrast and a more 2-D looking image.
I have furthered my knowledge of editing with Premiere Pro. In the past I have used different editing softwares such as Camtasia and Sony Vegas which are similar to but also completely different to Premiere Pro. For example, in Camtasia you don't have to manually render ever video and image that you put into the software. I have also learned how effective a simple cut can be in a video project. At the beginning my group and I thought it would be effective to have fancy transitions after every shot, however, this just made the video look very unprofessional. By just having a cut our moving image advert flowed better and made a lot more sense.
Teamwork
The team I was in have never worked together before and this has its advantages and disadvantages. First of all, the biggest disadvantage is that we don't know how each other work and what the other people's strength and weaknesses are. After the initial stage of getting to know the team I was placed in we slowly got to know the roles that everyone felt comfortable playing. For example, I was more more compatible with the direction and camera work aspect of the moving image advert, whereas someone else was more comfortable editing the advert itself. However, even though everyone had their own preferences, we all tried all of the different parts of the task, such as photography, moving image camera work, video editing and still image editing.
An advantage of working in a team is that you don't have to do all the work yourself meaning that there is less stress on each individual. This allowed the work to be completed faster than if working on our own. Although another disadvantage of group work is that certain individuals will take advantage of the hard working people in the group and will take a backseat in the production line whilst taking credit for the final product, and this was quite evident in my group.
Planning
During the planning stages of the product the recce and helped write the script which was a task completed with the input from everyone in the group. I also came up with the basis of the moving image advert, however, the entire idea wasn't just mine. As this was a group project, everyone contributed to the task to create the idea and storyboard that we did.
Planning was effective and useful for my group as it allowed everyone's ideas to be contributed and heard. It also gave us the opportunity to change things slightly if it didn't flow with the storyline correctly. Although a lot of good ideas do come to you whilst filming so we didn't stick completely to the storyboard and script, but this doesn't mean that they are completely useless.
If I was to do this task again, I would change the persuasive method(s) that we tried to put across in our advert as it could have been better if we tried it in a different way, yet there is the possibility that the advert could've also gone worse that it did if it was to be changed.#
How the project met my expectations
Everything about this project was a success in the fact that no matter whether or not what my group came up with was a failure or a professional level advert we have now learnt the skills to be able to make something better than what we just did in this unit of work. The skills that we have learnt and developed through this project will allow us to better our work in the future too as some of the skills that we have learnt are not mutually exclusive for just one style of work within the media.
In the future I hope to improve on everything as there is always room for improvement and I don't know everything so I will always be learning new things. No matter how good an advert I make in the future may be, it won't be perfect so I will have the opportunity to make it better.
Thursday, 4 October 2018
Thursday, 27 September 2018
My Print Advert

The main issue with this advert is that the main image doesn't stand out enough compared to the background as both are either yellow or yellow tinted. If I was to re-do this advert I would make sure that there isn't any coloured light reflecting off of the product when taking the picture.
Monday, 24 September 2018
Photography Studio Induction
When taking photos of someone in the studio, they must stand 5-6ft in front of the backdrop so they don't blend in.
Three point lighting:
Key Light - this light is used on its own to create contrast
Fill Light - this light removes the shadow created from the key light
Back Light - allows the image to look more 3D
Dials on Lights- 1 is the lowest setting. Have the dial set on 3 to start with.

Wednesday, 19 September 2018
Pot Noodle Research
Secondary Research
This product is an instant noodle style product that uses dehydrated ingredients that become edible when hot water is added. This type of product comes in many different forms across the globe, the most commonly known brand in the UK being Pot Noodle.
This product is mainly used by university students who aren't able to afford the ingredients to cook a proper meal or they may not have the time to do so, this product allows them to have a quick meal whilst getting on with their education. This product is also popular with people who have jobs where they aren't able to leave their desk to get lunch. This product allows them to carry on with their work while eating.
The instant noodle was invented by a Japanese man called Momofuku Ando in 1958. The oldest instant noodle company is a Japanese company called Nissin, formally known as Chikin Ramen. Although the instant noodle was developed in Japan, the noodle itself originates from China and was first made about 4,000 years ago
Most adverts for instant noodle products such as Nissin (Japanese Company) and Pot Noodle use humour to entice the audience into buying the product. This technique seems to be successful as various companies that sell instant/cup noodle products have gone for this approach.
This advert has taken a different approach than other companies and instead of going for a funny angle they have decided to show the practicality of the product and the different situations they can use the product in and the different members of their target audience that use it.

Pot Noodle has decided to use the reward technique to draw in customers for this print advert. The tagline states "Win £1,000 Every Day For 60 Days". The way that this advert is designed makes it seems as if you will win a total of £60,000 over 60 consecutive days at first glance. This wording is used to maximise the number of people who see and read the advert. The background is green which is a colour that catches your eye, it also isn't a commonly used colour in advertising. The largest piece of text on the advert is "WIN £1,000" in bright yellow and gold colouring which contrasts the green background which then keeps the reader more focused on the prize of £1,000.
The main image of the advert is a Pot Noodle cup with £50 notes flying out from inside, this is suggesting to the audience that they are 'likely' to win the money if they buy the product. The fact that we actually see a 'winning pot' in the advert makes the audience believe their chances of winning are a lot higher than they really are.
The target audience for these instant noodle products are people who need a quick and easy meal and don't have time to cook/prepare food. The age range of this target audience is from the ages of 18-45, the ages of university students who may not be able to cook for themselves yet and have to spend most of their time studying, and for people who have a hectic job where they aren't able to prepare proper meals for themselves.
The target audience for this specific advert would be the university students as they would be the people who need the money the most. This advert would make people who need the money buy the product as they would really need it.
Best Flavour?
After looking at various different polls, a lot of different flavours make it into the top 3. However, the flavour that appeared in the top 3 the most was the Bombay Bad Boy.
Celebrity Endorsement
Celebrities such as Alexandra Cane, Reece Whyte and Paul Potts have endorsed and advertised products such as Pot Noodles. These celebrities are not A Listers, however, where the advert is being shown, the viewers will recognise the advert.
Bibliography:
Primary Research

This graph shows how often the people who answered the questionnaire eat pot noodles. The highest percentages were never and once a month. This means that our advert needs to be presented in a way that will attract people to try pot noodles for the first time and to retain customers who would have already be buying pot noodles.

This bar graph represents which flavours people would want to try the most. This gives us a clear idea of which flavours to promote in our adverts.
 This chart shows which type of moving image advert people liked. Video 1 was a more serious video showing the practicality of the product, whereas video 2 was a humorous video that would get people's attention. Most noodle adverts use the humour persuasive technique, so it was surprising when the majority favoured the advert about practicality. Due to these results and our secondary research, we are going to use the humour and sensible methods in our advert in order to attract as much of an audience as possible.
Subscribe to:
Posts (Atom)